
This guide shows step-by-step instructions (with screenshots) on how to install Adina Kodi addon. The guide applies to all the devices that support Kodi, including Firestick & Fire TV Cube, Android TV sticks/boxes, Chromecast, and NVidia Shield.
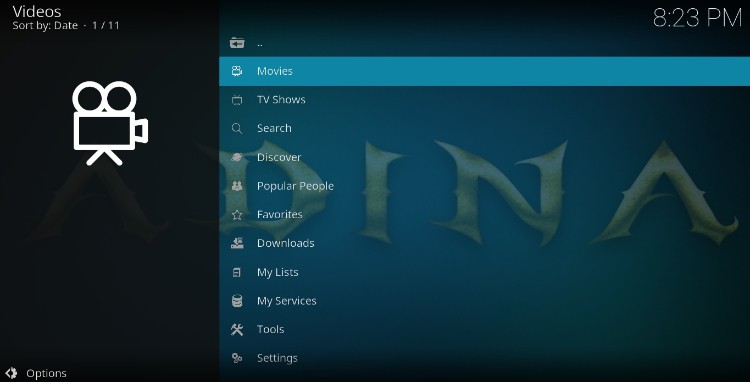
Adina is a superb Kodi addon developed by Tech E Coyote, the developer behind popular Kodi addons such as Dynasty, TapTV, LNTV, LooNatics Empire, and The Promise. The addon is a third-party Kodi Addon and a Fen addon fork, and it gives access to a great selection of movies and TV shows. On the main interface, you will find categories such as TV Shows, Movies, Favorites, Popular People, Discover, Search, Downloads, My Services, My Lists, Settings, and Tools.
One of the most impressive features of the addon is its content layout. The addon has a very straightforward user interface to simplify navigation. The categories offered are supported by several subcategories such as Trending, Premiers, Popular, Blockbusters, Latest Releases, In Theatres, Genres, Years, and so on. All these provide hundreds and thousands of content in HD.
Want to check it out? Below, we show how to install Adina addon in a few minutes. Note that the addon only works with premium services such as Real Debrid, Premiumize, and All Debrid.
Is Adina Kodi Addon Legal?
Adina Kodi addon provides access to thousands of free movies and TV shows. And although it relies on premium link providers, we can’t really tell whether Adina Kodi addon is legal or not. This is because services like Real-Debrid don’t host, own, or vet the content they provide, and they can integrate links that provide illegal access to copyrighted content.
👉 As a protective measure, we advise that you always use a reliable VPN whenever you are streaming on Kodi. This will prevent your ISP and government from monitoring your online activities, and it will also ensure that you are anonymous.
The VPN we Recommend
Surfshark is our VPN of choice for streaming, and we have been using it for over 3 years. Here’s what you get with the VPN:
- ⚡ Superb Speeds: Guarantees a smooth live streaming experience.
- 🌍 Huge Server Network: You can connect to a nearby server for a fast and stable connection.
- 😲 UNLIMITED Devices: Connect dozens of devices at the same time!
- 🔑Unblock Anything: Safe access to censored apps, websites and torrent sites.
- 😎 Best in Privacy: The VPN doesn’t keep any activity logs, and so your activities are only known to you.
- 🔐 Top-notch Security: This VPN uses AES 256-bit encryption and provides multiple protocols alongside other security features such as a kill switch, DNS & IPv6 protection and WireGuard.
- 💳 30 Days RISK FREE Money-Back Guarantee: In case you do not like the service, you can get every penny back if you cancel within 30 days!
How to Install Adina Kodi Addon
To make the installation process much more straightforward, we have divided it into 3 steps.
Step 1: Enable Unknown Sources
Adina is a third-party Kodi addon, so it’s not in the official Kodi repository. To install it, we’ll first need to enable installation from “unknown sources.”
Here’s the procedure for doing so:
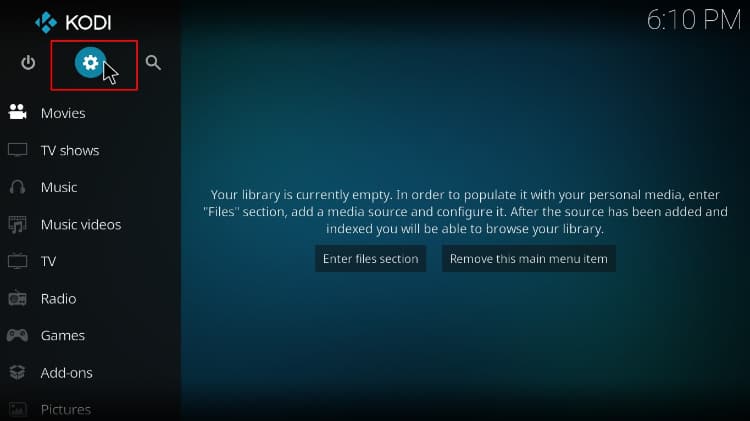
- Open the Kodi app and click on the Settings icon.
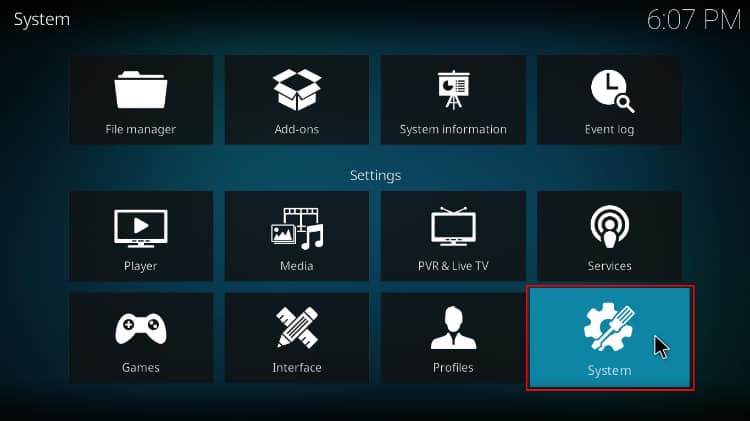
- On the settings page, select “System.”
- Hover over “Addons” and enable “Unknown Sources”.
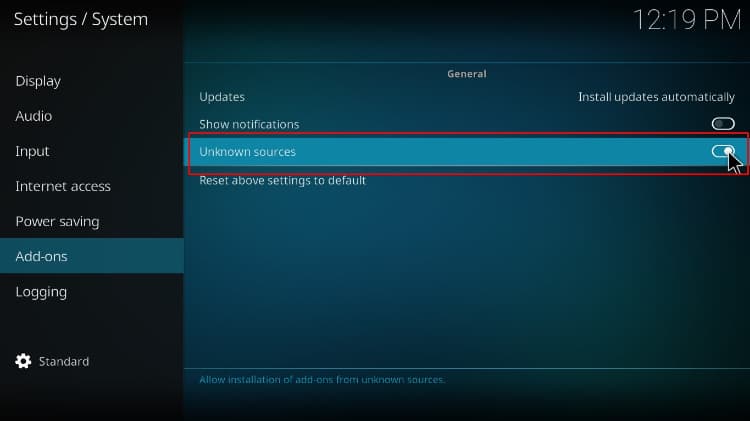
Kodi can now install addons from third-party sources. In future installations, this step can be skipped.
Step 2: Add The WareHouse Repository Source
To install Adina Kodi addon, we now need to install its host repository, The WareHouse Repository. But,
✋ At this point, we recommend that you turn on your VPN.
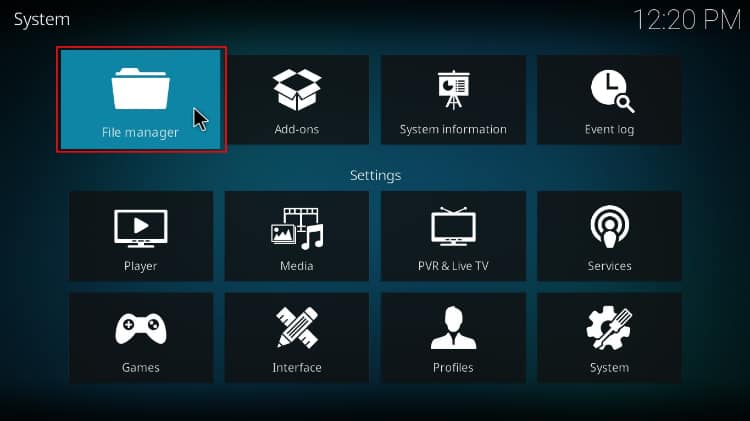
- After that, go back to the Kodi main page. Open Settings, then select “File Manager.“
- Now, we’ll add the Adina Kodi addon repository URL. Click on “Add-Source” and type in the URL
https://warehousecrates.github.io/TheWareHouse/into the window that opens. This will insert “TheWareHouse” in the textbox below. Click “OK.”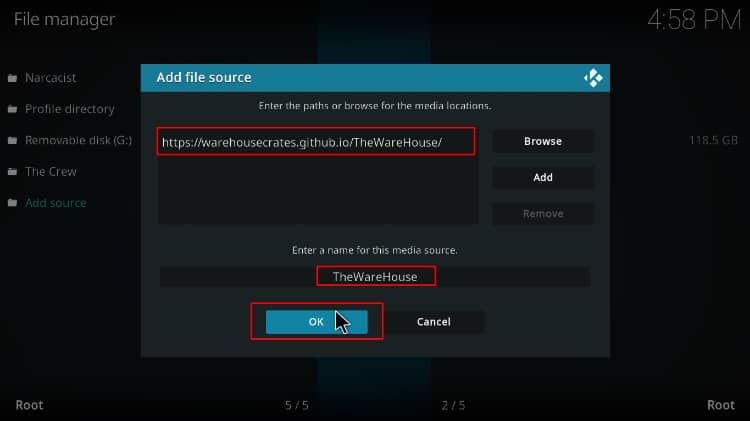
Step 3: Install Adina Kodi Addon Host Repository
We can now install The WareHouse Repository.
- Go back to the main page and click “Add-ons.”
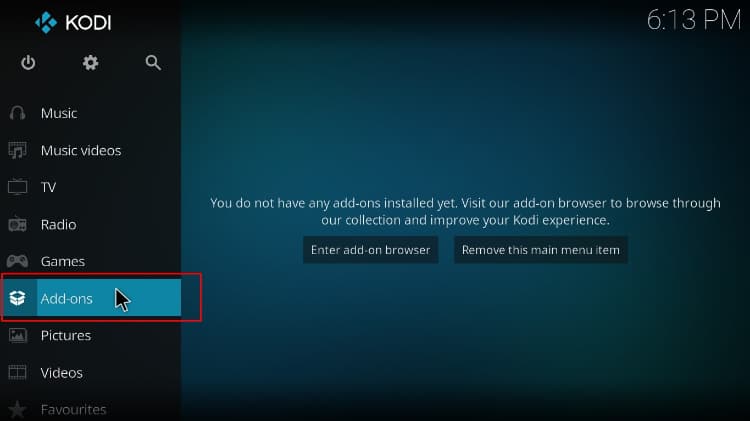
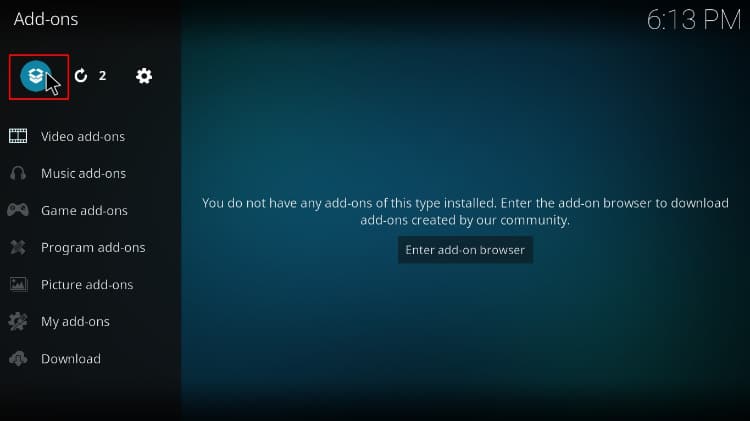
- At the top left side of the menu bar, click the package installer icon.
- Select “Install from Zip File.”
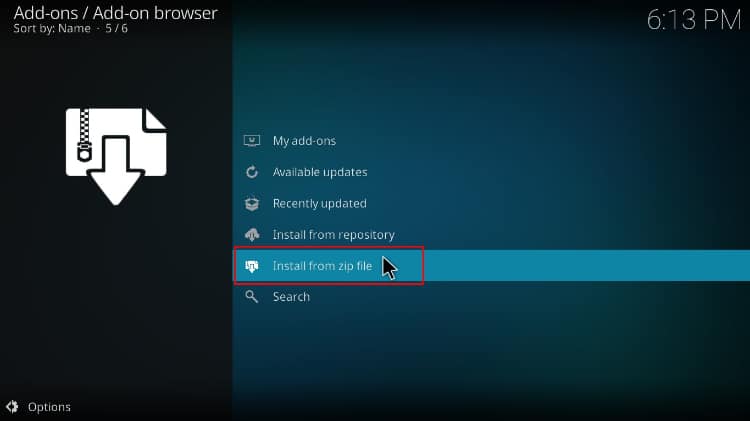
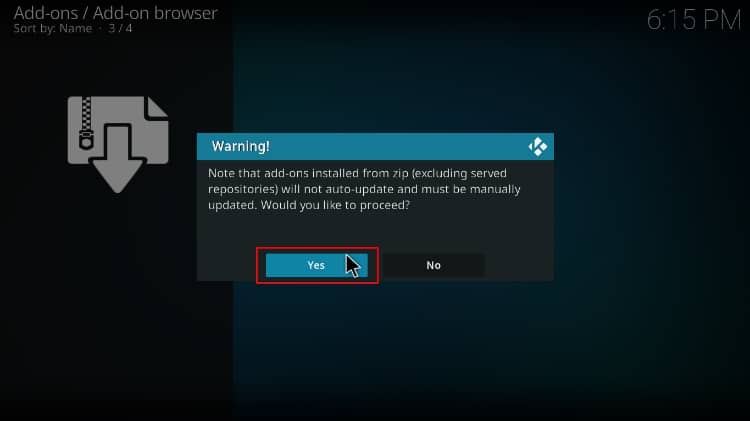
- This will prompt a warning. Click “Yes.”
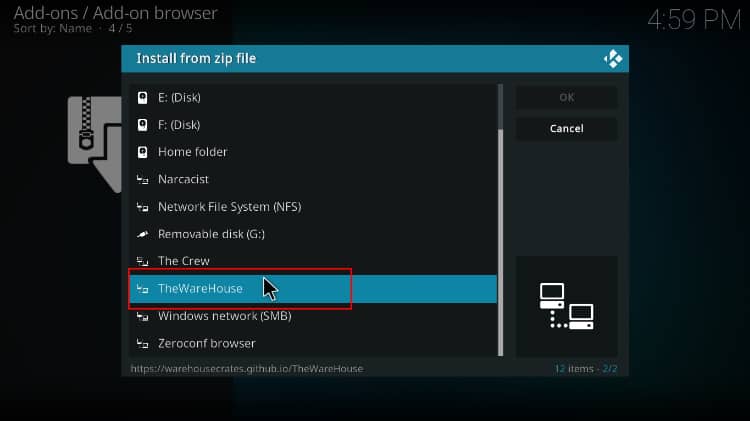
- Select “TheWareHouse.”
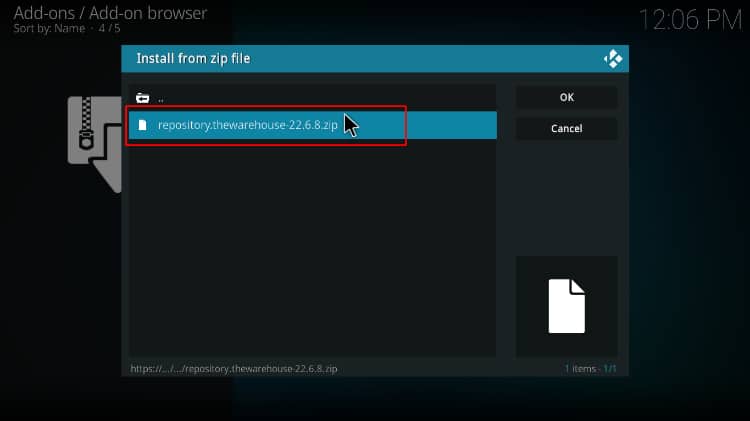
- Click on repository.thewarehouse-xx.x.x.zip.
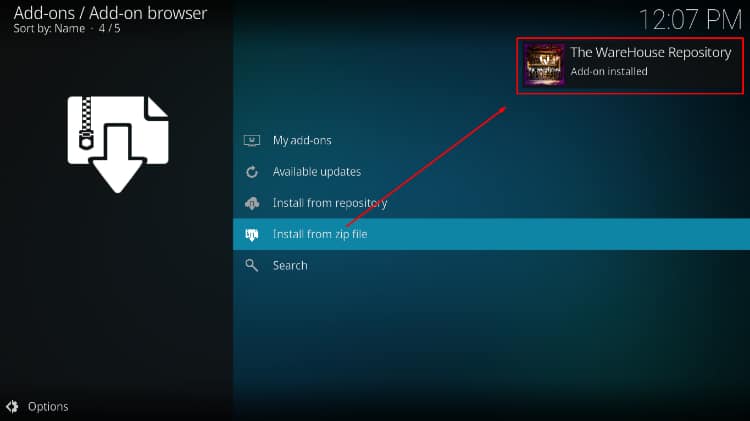
- You will receive a notification in the upper right side of your screen when the repo installs successfully; wait for it.
Step 4: Install Adina Kodi Addon
Finally, we can install Adina Kodi Addon.
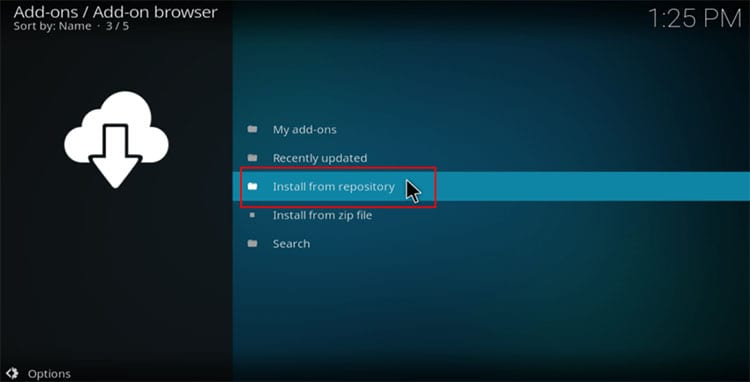
- While on the same screen, click “Install from repository.”
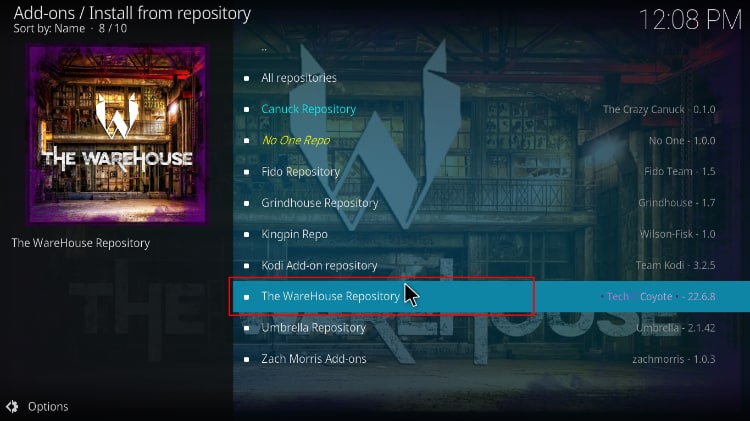
- Select “The WareHouse Repository.”
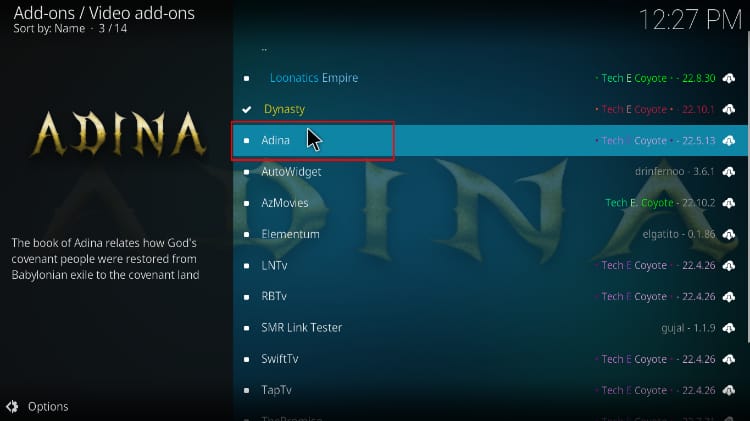
- Select “Video Add-ons,” and then click on “Adina”.
- You will now see an option to install the addon. Click on it.
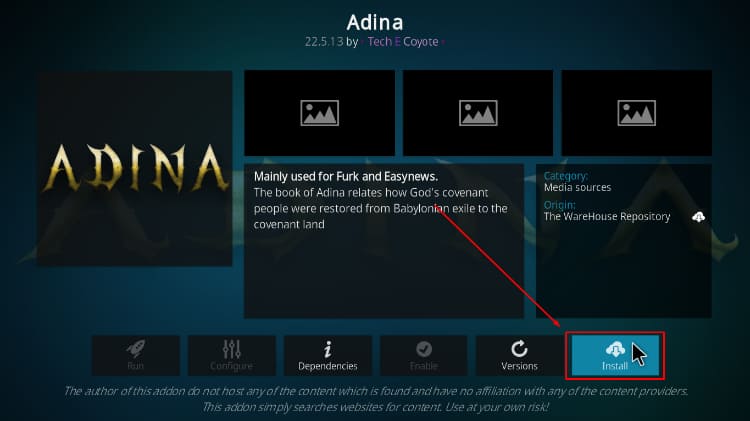
- You’ll get a pop-up of all the dependencies that will be installed alongside Adina Kodi addon. Just click OK, and you will get a notification after installation; wait for it.
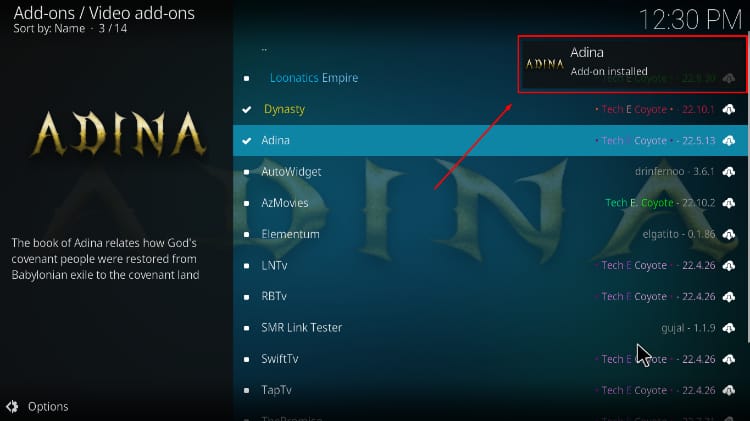
How to Setup Real-Debrid on Adina Kodi Addon
To start streaming via Adina Kodi addon, we’ll first need to set up a link provider. We’ll use Real-Debrid for this guide, but the other providers follow the same procedure.
If you don’t have a real-debrid account, you’ll need to create one first. From there:
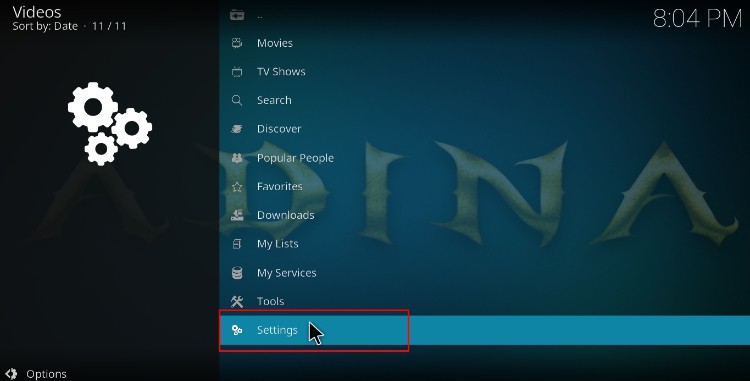
- Launch the Kodi addon and select Settings on the lower side.
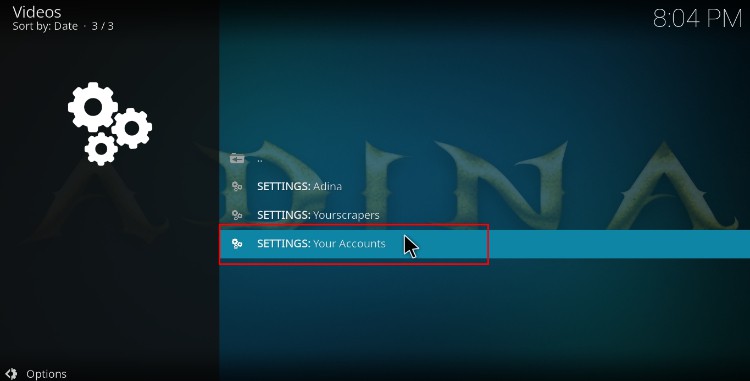
- Choose My Accounts.
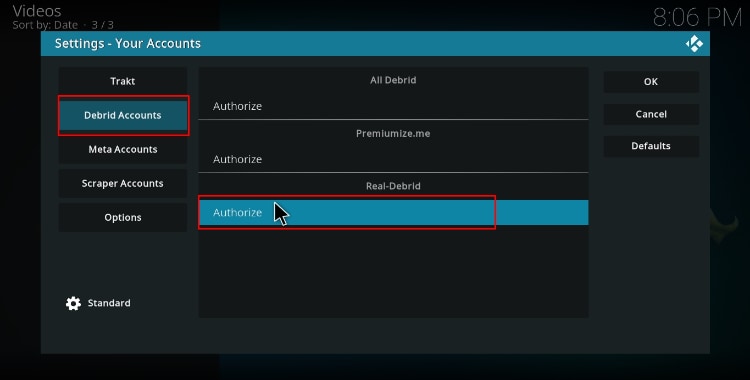
- Hover over Debrid Accounts and click Authorize under Real-Debrid.
- The addon will now give you an authorization code. Note it somewhere.
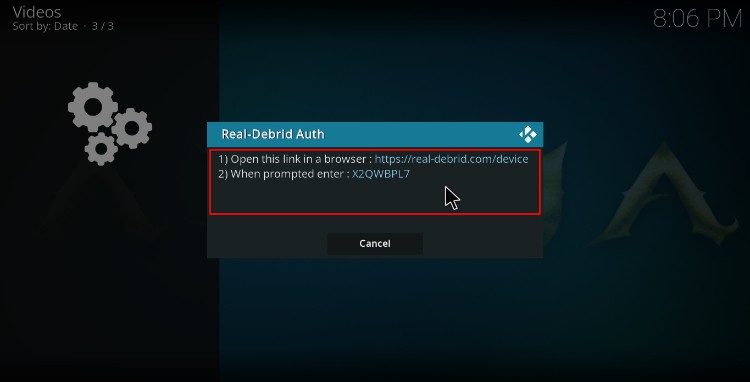
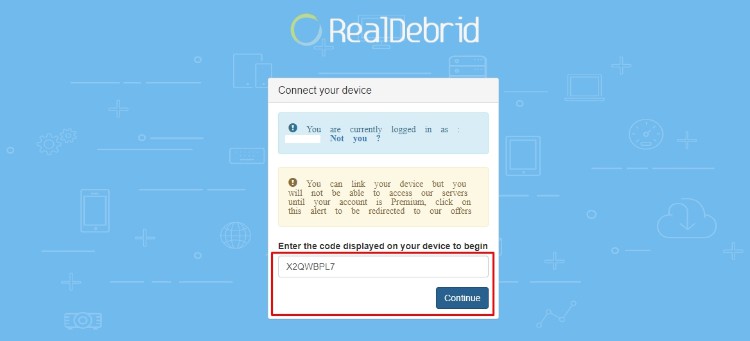
- Open your browser on the same device or a device on the same network and go to real-debrid.com/device. Input the provided code and click Continue (don’t use the code on the example below as it won’t work for you)
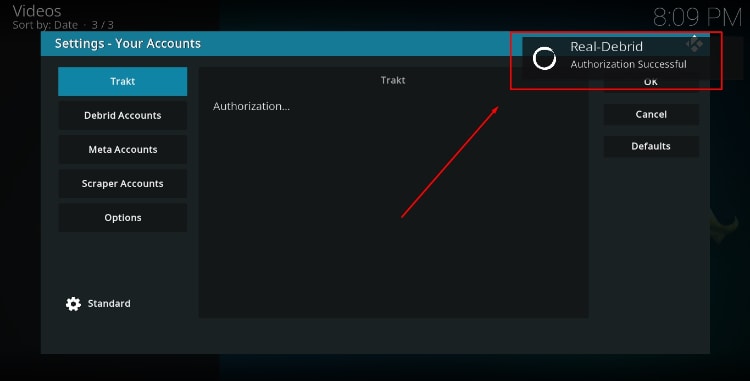
- When returning to the Kodi addon, you will see a Real-Debrid Authorization Successful notification.
You can now explore Adina Kodi addon and start streaming free movies and TV shows.
Check out more Kodi addon installation guides
Wrap Up
Adina is a superb Kodi addon you can install to enjoy a wide selection of Movies and TV shows. With the guide above, you should be in a position to install it without difficulty. However,
Keep in mind that this is a third-party addon, so ensure you protect yourself using a reliable VPN such as Surfshark.
Enjoy!


Leave a Reply