
Builds are great program addons to install on Kodi. They provide us a simple and fast way to install the best addon collections, skins and other configurations at once. This guide is about Xanax Kodi Build, probably the best build for streaming on Kodi 18 by now.
Kodi is one of the most popular online streaming applications available in the market which is free to use. Kodi lets you use various addons to enhance and improve its services. Addons are small applications that extend the purpose and the functionality of the basic software. These addons combine to provide the best online streaming experience in your streaming device. The addons available are both official addons and third party. Depending on the addon chosen you will have access to different features.
About builds
While installing a Kodi build, you must examine it to make sure whether it satisfies your preferences. You should not opt for a build just because of its popularity. Rather choose one that has the addons you’d use most often. With the advent of Kodi Builds, you can edit everything in the interface, from the addons installed, to skins, to the settings, to the performance, and much more. A Kodi build paves a new creative way for the users to get acquainted with the Kodi software.
Xanax Build
Being a compelling build for Kodi, Xanax build for Kodi 18, provides a vast number of features to create the best streaming experience. Xanax Kodi builds is from the same crew that gave us the Durex build for Kodi. The Durex build was one of the most popular builds for Kodi once. It became inoperative. Xanax is the perfect replacement for Durex as they have similar structural and functional aspects which people tend to love.
This build comes with a vast collection of video addons like Exodus Redux, Yoda, Maverick TV, and much more. With all of the options available, you’re going to end up using Kodi even more than you previously believed possible! It doesn’t take too much space and is stable with Kodi 18.
The Necessity of a VPN with Xanax
Whenever you make use of the build in Kodi, you should install a VPN (Virtual Private Network). The installation of VPN is a necessity to protect, encrypt, and save the data, and also ensure the security of the device. Hackers, Internet Providers, or even the government can monitor your online activity through the visible IP address.
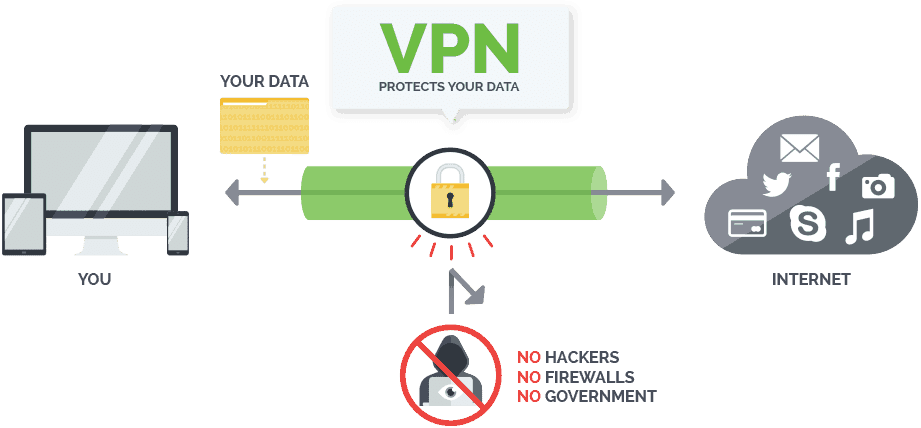
By using a VPN, you can mask the IP address and be anonymous while working online.
A commercial VPN like Surfshark helps you by creating a secure, private and encrypted tunnel between your device and the VPN server. This private connection not only improves your security but also gives you a way of bypassing geographic restrictions.
The best choice
With a huge number of servers around the world, Surfshark is one of your best options when dealing with censorship. However, that’s not its only benefit. VPNs help ensure that your ISP maintains its service levels. You see, streaming content online is quite bandwidth intensive. ISPs tend to use “fair use” policies against people that stream, to reduce their connection speeds. This often leads to buffering and crashing of streams. With a VPN like Surfshark in place though, ISPs are unable to determine what you are doing so they cannot block your access.
Choosing the right VPN is important. When it comes to Kodi, in my opinion, there is no choice really except for Surfshark. Aside from the thousands of servers around the world, it also has a strict no-logging policy. This ensures that your information can never be shared so you truly are anonymous online whatever the device you use, as you can protect simultaneously all them with a single subscription.
To help you getting start, we managed to get an exclusive 82% of Surfshark.
How to Install Xanax Kodi Build
Xanax is a brainchild of the creators of the ever-popular Durex build and brings the tremendous old experience back. Xanax features the design, layout, and addons similar to the Durex. The size of Xanax makes it the most favorable build for Kodi. Now let us look into the procedure behind installing the Xanax build for Kodi.
Enabling Unknown Sources
- Launch Kodi
- This step launches the Kodi application on the device.
- Click the Settings Icon
- Proceed by click the system option in the Settings Menu
- Now, click the add-ons button and switch on the unknown sources button.
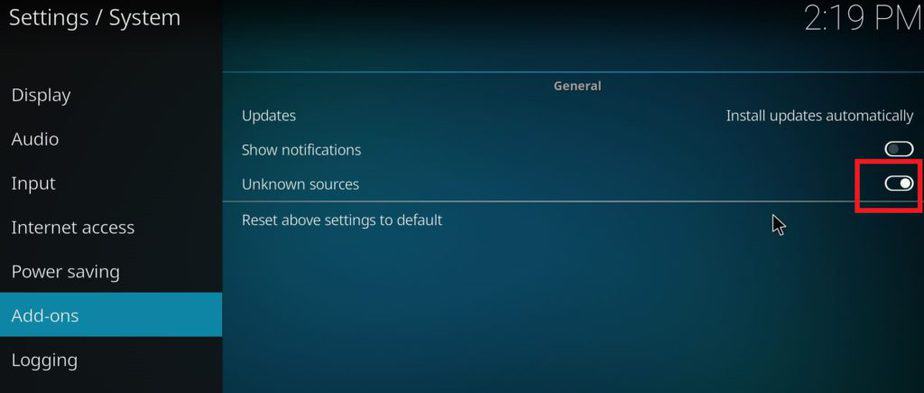
- Return to the previous screen
Installing Xanax Build for Kodi
-
Open File Manager
- The file manager is for browsing the build and installing it for Kodi. After opening the file manager, click Add Source option.
- The add file source dialog box appears. Select none in the display option and then click the Browse option.
- Type the exact URL as mentioned here http://xanaxrepo.com/repo/ and then press ok.
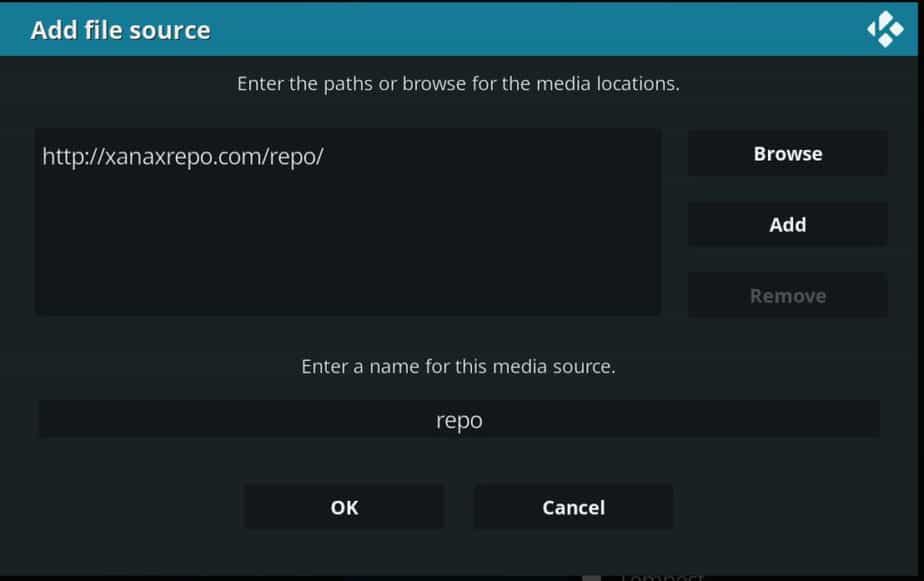
- Highlight the box under source which you made use to type the link and enter a name for the media source and then click OK.
- Click the back button back to return to the System Page.
-
Click Add-on buttons
- The add-ons menu opens. Now click the option selected from the zip file.
- Click the name which identifies the media source.
- Open the folder to get the zip file of the name “Xanax-repo.zip” which is the source of all the add-ons.
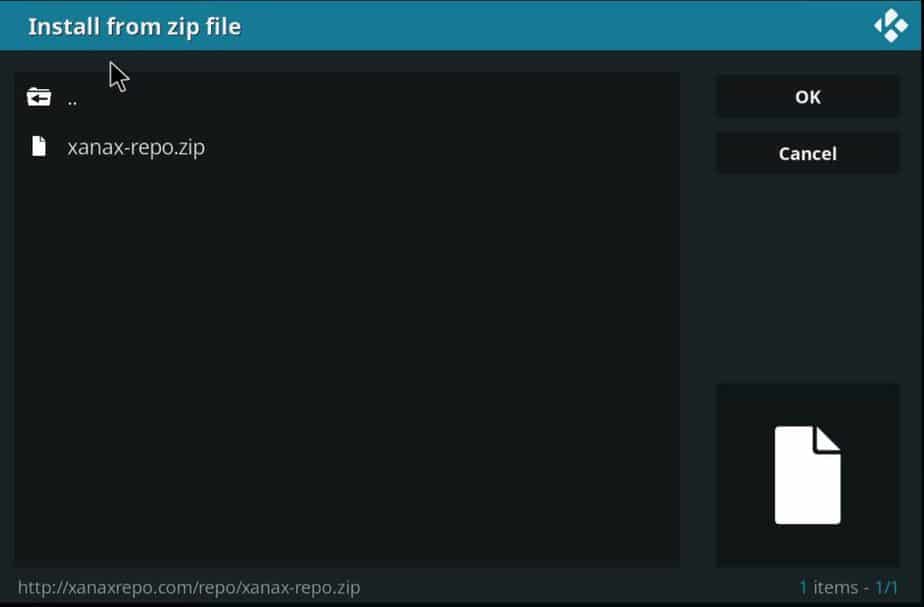
- Wait for the device to complete the installation of “Xanax-repo,” which is the Xanax repository. The installation notification is “Xanax Repository Add-on Installed.”
-
Click for the option install from the repository.
- Select the Xanax Repository to select the add-ons.
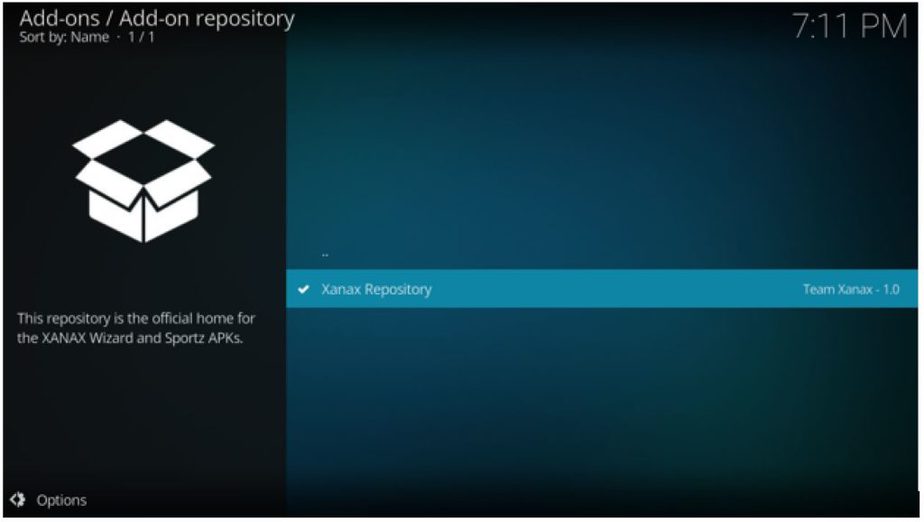
- After entering the repository menu, select program add-ons.
- The next screen appears — select Xanax Wizard options from the menu.
- The Xanax installation wizard screen appears. The next step is the final installation of the build, which contains tons of add-ons.
- Click the install option.
- Wait for the Xanax installation wizard to install all the necessary packages. The completion notification appears as “Xanax Wizard Add-on Installed.” After this process, click Continue.
- The next menu appears. Click on the build menu.
- In this place, you are given two options for selection Leia Builds (for Kodi 18 and above) or Krypton Builds. (For versions below Kodi 18.1). If the build doesn’t install properly, you should opt for a different host until your file downloads without any hindrance.
- Select the option Xanax standard install from the various build options available.
- The installation approval box appears. Click Yes, Install.
- The download starts, and the installation becomes plausible. Be patient for the download & installation to finish.
- Click force close after installation in the reload box.
- Select the Xanax Repository to select the add-ons.

After closing the wizard, re-open the Kodi app to experience the magical change and improvements added to it.
XANAX Build – Enjoy the Best Experience, safely
Xanax build for Kodi provides you with a rich streaming experience online. The build developers were the ones who created the former best build Durex. Xanax acted as a replacement for Durex with new advancements and added applications to it.
Kodi builds provide unlimited streaming content, but it might get you in troubles involving legal and copyrights issues. Also most of the Kodi addons and builds are geo-blocked due to transmission rights. Hence, it is always safe for you to use a VPN like Surfshark or one from the List of the Best VPNs, to hide your own identity while streaming movies, TV series, sports, and much more, as well to unblock geo-restricted contents, and have smooth streaming avoiding ISPs throttling.
Hope you liked this guide about Xanax Build and how to install it on your Kodi. Please rate this article and let us your insights in the comments box, bellow!
Have a Xanax and be happy!
[kkstarratings]


Igor Sandler says
Hello, do you know if it’s possible to change default Xanax skin to show an additional movie and episodes information rather than just an icon?