Looking for methods to fix Twitch keeps buffering/ freezing issues? You are in the right place. This article gives you different solutions to help you get to the bottom of these Twitch issues.
Certainly, Twitch is one of the most popular online streaming services among gamers globally. With the streaming platform, you can watch live stream gaming videos, broadcast live games, and interact with various gamers without spending a dime. However, sometimes the experience may not be so smooth as you may encounter Twitch buffering issues.
Some of the related problems that Twitch users have been experiencing include Twitch playback buffer, VOD, clips buffering, and even the dreaded Twitch black screen. Additionally, there have been reports of Twitch buffering every few seconds in nearly all browsers. So, how can you fix this?
We are here to help you out. In this guide, we have put together several ways that you can try to fix Twitch keeps buffering/ freezing issues.
Let’s get started!
Fix Twitch Streams Buffering Issue (Best Solutions)
If Twitch keeps buffering, the issue may be caused by various factors. Here are some solutions that you can use to solve the problem. Note that the browser instructions may vary depending on your browser.
1. Disable hardware acceleration
Hardware acceleration involves your computer’s hardware being forced to perform faster than the usual standard computing of a typical CPU. This technique uses your GPU in data processing to enhance your browsing experience.
Unfortunately, it can lead to various complications with your browser, including buffering issues. You can disable hardware acceleration on your device and see if it will fix Twitch buffering.
How to disable hardware acceleration:
- Click on the three-dot symbol at the top-right of your browser, then go to Settings.
- After that, scroll down to Advanced option. Click on it.
- Now scroll down to System. Turn off the switch next to Use hardware acceleration when available to disable the feature. You can also simply search it.
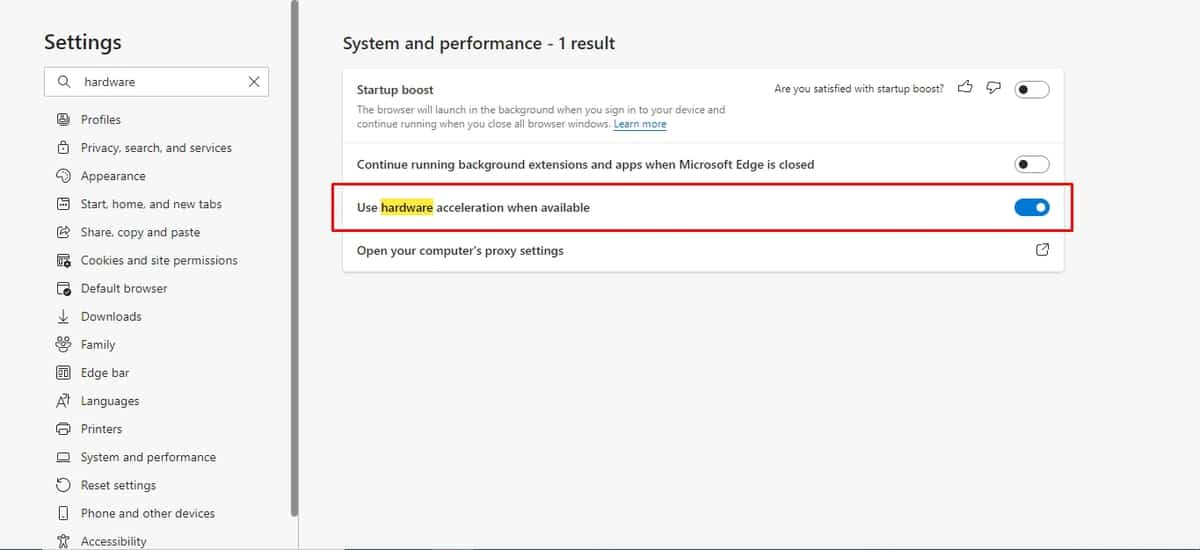
From there, relaunch your browser to restart it and finalize the changes made.
2. Clear your browser’s cache
Generally, your browser’s cache and cookies may lead to various problems, and it may be why Twitch is buffering. Therefore, you occasionally need to clear cookies and cache.
How to clear the browser’s cache:
- Click on the three-dot icon at the top-right corner.
- Scroll down to More Tools. Hover over “More Tools” and click on “Clear browsing data.” There will be a pop-up dialog box.
- In the dialog box, set the time range to “All time” to clear the cache entirely.
- Confirm that the “cached images and files” checkbox is marked.
- Finally, click the “Clear data” button to clear your browser’s cache and cookies fully.
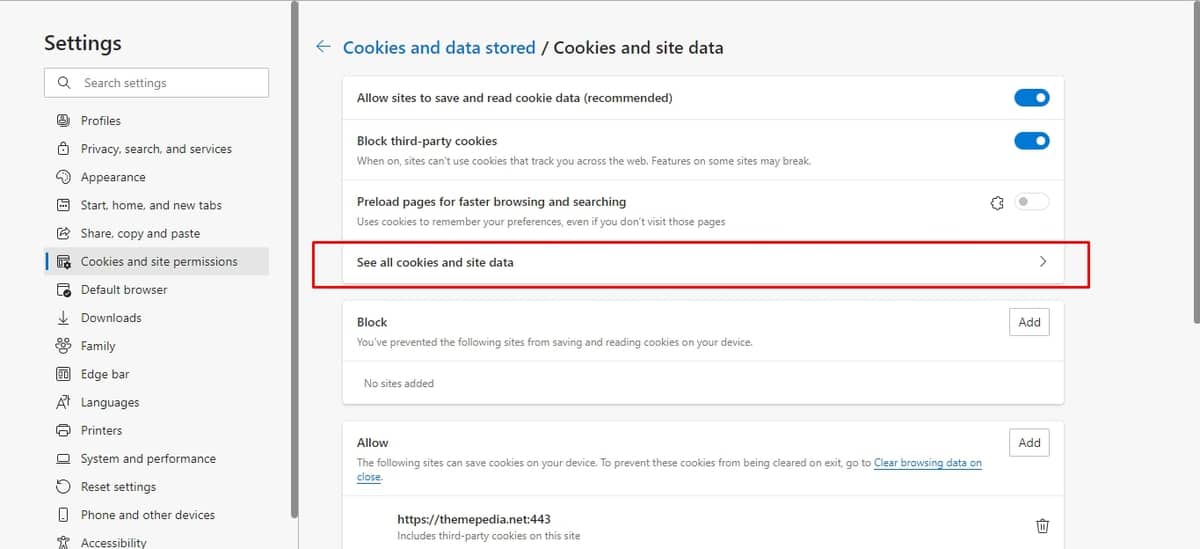
Once done, test to see if you have fixed your Twitch buffering issue. If you still experience problems, you can proceed to try the other solutions mentioned below.
3. Disable unnecessary browser extensions
Additional extensions to your browser may also lead to Twitch constantly buffering. These include script blockers and ad blockers. The best solution for these issues is to disable all unnecessary browser extensions. If this quick fix works for you, you can enable the extensions one by one to track down the extension that is causing twitch buffering issues. After you have identified the extension, you can permanently remove it or leave it disabled.
How to disable browser extensions:
- Click the three-dot icon at the top-right corner.
- Scroll down to More Tools. Hover over “More Tools” and choose “Extensions” to open them.
- Uncheck the Enabled checkbox to disable any extension. You can also click the trash can icon next to the extension you’d like to delete.
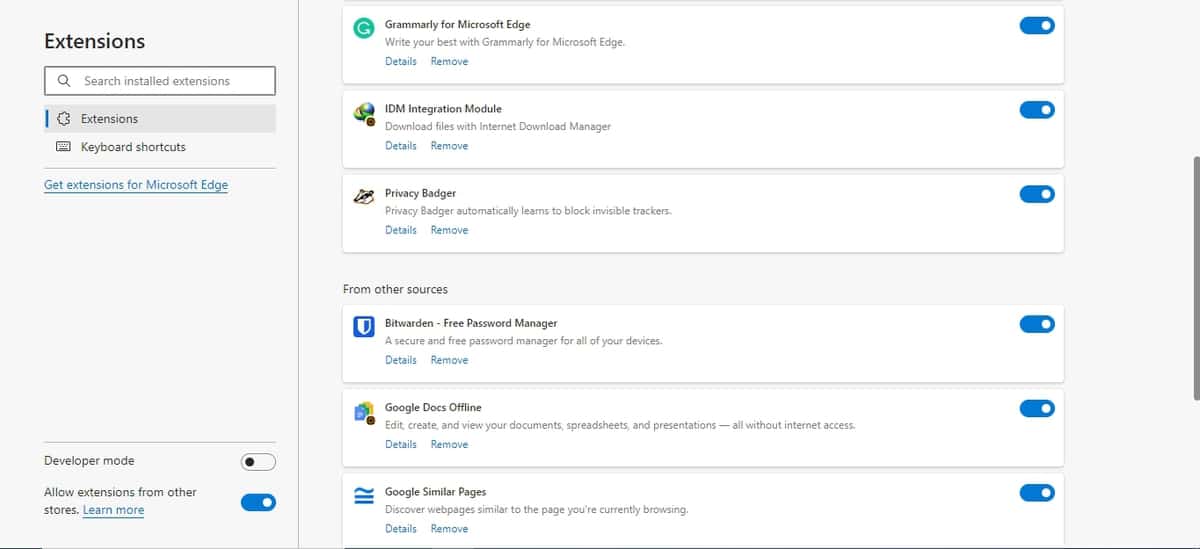
Once done, go back to Twitch to test if it is now working seamlessly.
4. Change your DNS
In case your twitch stream keeps buffering, you may consider checking your DNS configuration; this is because your DNS configuration might be wrong, and Twitch/ its servers may be failing to accept it. If this happens to be the issue, you can change DNS to Google’s public DNS.
How to change your DNS:
- Go to the Control Panel and right-click the Network icon.
- Click “Network and Internet.”
- After that, go to “Network and Sharing Center” and then select “Change adapter settings.”
- Click on the network connection you are currently using and select “Properties.” In case you are prompted for your administration password, type in the password for confirmation.
- Now in the next pop-up, select the “Network tab.” Under This connection uses the following items, select “Internet Protocol Version 4 (TCP/IPv4)” and click “Properties.”
- Click “Advanced” and select “DNS” tab. If you see any DNS server IP addresses listed, note them down for reference. After that, you can remove them from this window.
- Select “Use the following DNS server addresses.” If you find other IP addresses in the Alternate DNS server/ Preferred DNS server, note them down for future reference.
- Now you can replace the IP addresses with these Google DNS server IP addresses:
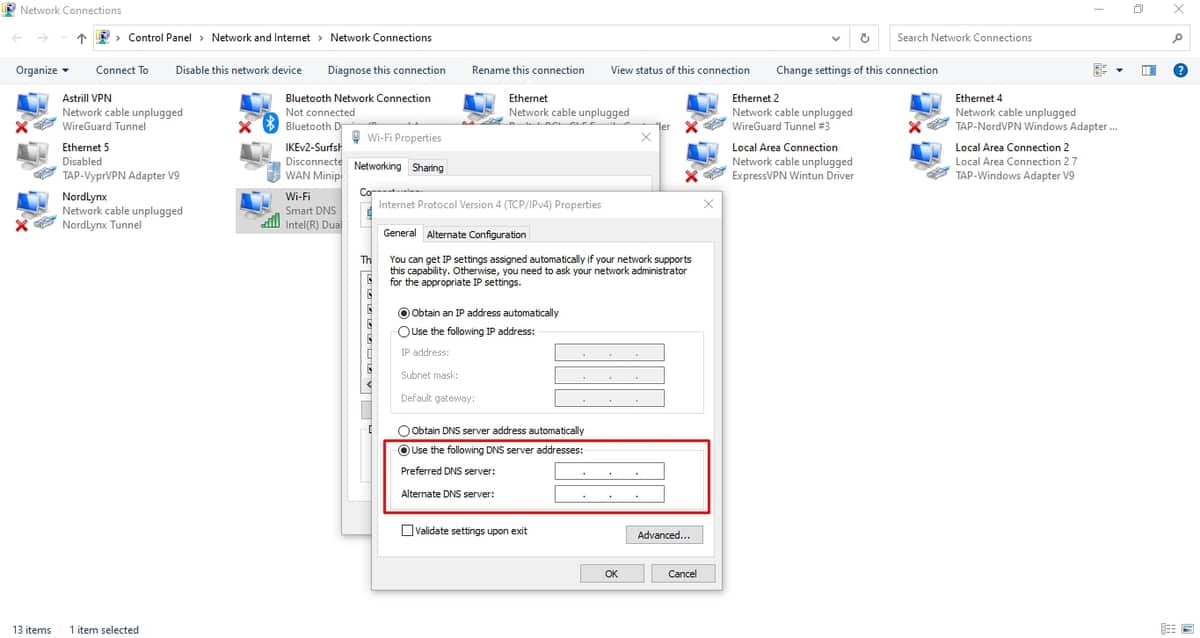
Preferred DNS Server: 8.8.8.8.
Alternate DNS server: 8.8.4.4
👉 You can also change your DNS automatically by simply connecting to a reliable streaming VPN. After that, launch your Twitch application to check if it is working smoothly.
5. Close background applications
If you have tried out the solutions mentioned above and Twitch keeps buffering, try closing all unnecessary background applications. It would be best to start with the apps consuming a massive portion of your bandwidth, including programs frequently downloading/ updating patches from the internet.
You should also check if apps are operating in the background. They may be consuming a significant part of your bandwidth.
How to disable background applications:
- Go to your Start menu and select “Settings.”
- Click “Privacy” and select “Background apps.”
- Under “Choose which apps can run in the background,” turn off all the unnecessary apps you would like to disable.
From there, check to see if Twitch buffering is fixed.
6. Check your Antivirus
An infection on your Antivirus software protection may lead to twitch stream constantly buffering. You can run an overall system scan with a good antivirus scan and see if this will help resolve your twitch buffer issue.
How to scan your system with an antivirus:
- Go to your Start menu and type “Windows Defender” in the text box for searching programs.
- Select “Windows Defender” from your list. If you are requested to check for updates, proceed and click “Check for Updates Now.”
- After that, click “Scan.”
- Windows Defender will now scan your device and inform you of any suspicious activity detected.
Now, you can use Twitch to see if the Twitch buffer issues are fixed. You should also note that even if your device were free from any malware infection, your antivirus software could also be interfering with the Twitch feed.
If your Twitch keeps on buffering and you have scanned your machine, you should try to disable the Antivirus software you are currently using. You can also try a different antivirus program and test if Twitch now streams seamlessly.
7. Disable your proxy or VPN
If you are using a proxy or a VPN for streaming Twitch, you may want to ensure that it isn’t causing any issues.
To disable your proxy, follow the procedure below:
- Go to “Settings.”
- Now, click the “Network & Internet” option.
- From the drop-down menu on your left select “Proxy” and disable them all.
Now that you have deleted all the proxies, you can disconnect your VPN if you are using one. Test Twitch to see if you have resolved Twitch buffering issue.
8. Block specific IP range
Some Twitch users have encountered a constant twitch buffering problem and have reported that they have solved this issue by blocking a specific range of IP addresses in the firewall. The procedure is not as straightforward as the rest, but you can also follow our guidelines below.
- On your search box, type “Windows Defender Firewall with Advanced Security.”
- In the new window pop-up on your left panel, click “Inbound Rules,” and on your right panel, select “New Rule.”
- After selecting your preferred custom rule, click “Next.”
- Now, select Scope. Under “Which remote IP addresses does this rule apply to?” select “The IP Addresses” then click “Add.”
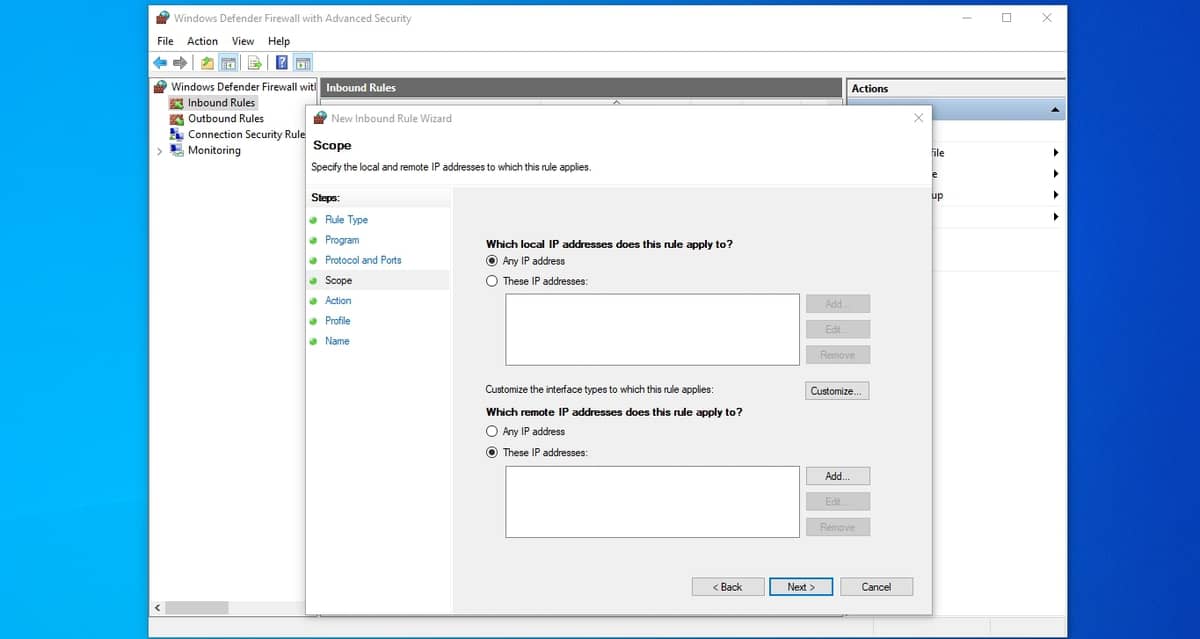
- Type in the following addresses and click “OK.”
From: 206.111.0.0
To: 206.111.255.255
- Repeat steps 4 and 5. However, this time you will add the following range of IP addresses :
С: 173.194.55.1
From: 173.194.55.255
- On your Action screen, select “Block Connection” and proceed to click “Next” to complete the process.
Once you finish configuring the firewall, restart your machine, and check if you can use Twitch without any buffering issues.
9. Channel bonding technology
If you are still experiencing Twitch buffering problems even after trying all the methods listed above. In that case, you can try channel bonding, which involves a cable modem combining multiple channels to increase traffic size that it can conveniently support.
Try this out, and it should help your Twitch buffering problem.
Why Your Twitch Stream Is Buffering
Various issues can lead to your Twitch streams’ constant buffering. You are likely to notice one of these indicators listed below when watching Twitch streams.
Common Causes For Twitch Buffering or Freezing
Here are the most common causes for Twitch streams buffering or freezing while watching:
- Slow Internet Speed. Video content that is available on Twitch is of high-resolution. Therefore, you require more internet speed to finish data transfer. Twitch users that have a slow internet speed are likely to encounter Twitch buffering when streaming. In such situations, you may need to change your internet to a more reliable one.
- Twitch’s servers/platforms.Twitch issuesYou are likely to encounter Twitch buffering issues if Twitch is experiencing hitches with their servers/ platforms.
- Device issues. If you are using a machine that is too old and outdated in terms of hardware specs, then this may cause Twitch stream buffering issues. You may need to use more modern streaming devices.
What Causes Twitch Keeps Buffering With Good Internet
Slow internet speed is the core issue that leads to Twitch buffering. However, if even with a good internet connection, users are still facing lagging/ buffering issues. Here are a few reasons why:
- Your ISP has peering problems with the streaming service. For instance, YouTube videos may be playing well on your device, but you may be encountering Twitch buffering issues.
- The installed apps on your device may be interfering with Twitch.
- You may be facing temporary technical issues with your ISP, such as having a lower bandwidth than your usual one.
- There may be Twitch service problems.
👉 To rule out problems caused by your ISP (eg speed throttling), use a reliable VPN like Surfshark. ISPs frequently reduce internet speed and bandwidth when they detect unusual bandwidth consumption.
What’s the Reason: Slow or Unstable Internet?
At any time you are trying to watch Twitch streams, and they are constantly buffering, often it all stems from your internet connection. Whenever you don’t meet the bandwidth requirement, you are likely to experience:
- Low-quality streams as Twitch will adjust the resolution of your streams for a smooth playback automatically.
- Video streams keep stuttering. While you are streaming on Twitch, videos may pause and may continue at the worst possible time.
- Buffering when streaming.
What Does Twitch Buffering Look Like?
There may be several indicators for Twitch buffering. When Twitch begins to buffer, you are likely to notice the following:
- Low Resolution. Occasionally, when you encounter lag from your internet connection, your Twitch stream may not pause but instead appear in low quality.
- Twitch streams keep freezing. This is very annoying to a Twitch user as your stream may pause during the game’s best moments.
- VoDs on Twitch are Laggy. Although you may be watching a VoD rather than a live stream, you may encounter problems watching a video recorded previously. You may be required to pause the video for a short while before you resume watching it again.
Who’s Fault Is This Mine or Twitch’s?
The simplest thing that nearly every Twitch user does whenever they encounter a Twitch buffering issue is holding Twitch accountable. However, at most times, the problem is not on their end except if you see @TwitchSupport tweeting about any problems on the site. As we know, Twitch users are not the calmest bunch when it comes to streaming problems. Hence, you would automatically know when the fault is on Twitch’s end, which implies that you have to try and solve the problem on your end. Luckily, we have provided you with various methods you can try to fix Twitch buffering issues.
While streaming, your first point should always avoid any ISP intromissions whether being speed throttling or any other restrictions on your internet activities. Use a reliable VPN like Surfshark; you’ll be able to surpass most of the issues caused by your ISP.
We hope that one among them helps you out. If not, you can proceed to contact Twitch Support for assistance. We hope this helps.
Enjoy!


Leave a Reply