

Emby is an excellent streaming application but, because differs from other popular streaming applications like Kodi, this guide intend to be the most complete as possible helping the starters on How to Use and Setup Emby.
Emby is a personal media server that provides a variety of features to enhance your media experience. One thing you need to know about Emby is that it is a media server. Why have I repeated that twice? Well simply put, I want to ensure that there is no confusion. It is not a media streaming platform, such as Netflix, Amazon Prime, and other popular media streaming programs and applications.
To get the best experience from Emby, it’s best to have your own media streaming devices – this can OTA TV or even IPTV, or your own personal media collection that you might have collected over the years.
Servers and Apps Emby Supports
Now, in this complete guide for Starters on How to Use and Setup Emby, here’s a brief reference to Server and client apps.
Servers Emby Supports
Emby supports a variety of servers, such as Docker, FreeBSD, and Linux. Other servers Emby supports include Windows and Mac.
Apps Emby Supports
The apps Emby supports include Apple and Android TV, Google Play, Amazon, Roku, and Kodi. Other apps that are supported by Emby include Windows 8, Xbox One, Windows Desktop, Windows phone, Sony PlayStation and more.
Using a VPN With Emby
Before we go further on this guide about How to Use and Setup Emby, let’s talk about privacy and security concerns.
When you’re streaming online it’s critical to have a Good VPN like Surfshark in place. There are several key reasons for this – the first is privacy protection. VPNs ensure that your activities online are kept hidden and cannot be monitored. By creating a virtual tunnel between your device and the VPN server, no one is aware of anything you do online.
This is important for several reasons – one of which is that Emby and other Media Servers like Kodi and Plex provide access to third-party plugins, addons, and applications. These often have pirated content which depending on the rules where you live could cause you significant problems and issues.
Another reason why privacy matters though is that many ISPs (Internet Service Providers) use a fair use policy even with unlimited plans. This often means that they block or slow down internet traffic for people streaming online. This can often cause significant buffering which makes streaming next to useless.


Our recommendation
When it comes to picking the right VPN there are many options available. However, the one I always choose is Surfshark. This is for several different reasons. Firstly, they have servers all over the world so you’re guaranteed to get a fast connection regardless of where in the world you live. This also lets you access content from countries that you’d otherwise be blocked and with thousands servers around the world, this is never a problem.
Another big plus for Surfshark is their no-logging policy. Basically, this states that they do not retain any record of you or your activities online. Many free VPN services do not have this policy which leaves you at significant risk. Luckily for you, we managed to get an exclusive 82% of Surfshark.
How to Use and Setup Emby
Having solved the privacy and security issues, let’s move forward with this guide on How to Use and Setup Emby.
How to Install Emby
Emby is a client-server streaming application; this means you have to install and configure a:
- Server
- Client
So, starting for the begin …
Installing the Emby Server
You may install the Emby Server, on one of the following devices:
- Windows PC
- Mac
- Linux
- NAS devices
- Docker
- FreeBSD
- NVIDIA Shield.
So, choose yours and download the corresponding server at: https://emby.media/download.html
After run and install it should be automatically launched the configuration wizard on your browser but, if not, you’ll be able to access it by visiting:
http://localhost:8096/web/wizardstart.html
The wizard will let you chose the language as well the type of content to view on the Client devices. After that you’ll be able to specify the location to store the content to view such as a local drive, a mapped drive, or a UNC path for a shared folder.
Finally, after your set up completes, the wizard will drive you to Emby Server dashboard. This where you’ll control your server.
In this stage of this complete guide for starters on How to Use and Setup Emby, you already have installed the server, but if you installed it on a device running Windows, you can go even further…
Emby server Always On for Window
When you’re using Emby on Windows, you should allow it to start as soon as your computer boots so you can always have access to your media files.
If your computer is running fine or you don’t need continuous access to your media files, you don’t have to use Always Up. If your computer runs a little slow or you want to have quick access to your media files, download and install Always Up

- Download and install Always Up application into your Windows computer
- Start the application by double-clicking the app.
- Once you start the Always Up app, select the “application” tab, and then select the “add” tab. From the “add” tab, open the “add application” window.
- Under the “general” tab, find the “application” tab. In this tab, you will see a place to enter an executable path for the Emby server, which is:
EmbyServer.exe (C:\Users\[USER-NAME]\AppData\Roaming\Emby-Server\System\EmbyServer.exe.

- The space labeled “username” in capital letters is where you enter the name you use when you log on to your computer.
- To enable Emby to start automatically when your computer boots, select the “application” tab and select the “automatic” option.
- Find the “name” tab and name the application “Emby Server”. You can choose any name you desire for the new application, but “Emby Server” stands out and is easy to remember.
- The next step is the most important step. Next, click the “log on” or “log in” tab. You will be asked to provide a username and password. Make sure you provide the username and password information for the account you will use with Emby.
- You need to select the small box on the left-hand side of the “log on” tab. The instructions will ask if you want to run the Emby application using a specific account instead of running the program using your computer’s default settings. Click the tiny box makes a check mark appear. Make sure you see a check mark in the box before continuing to the next step.
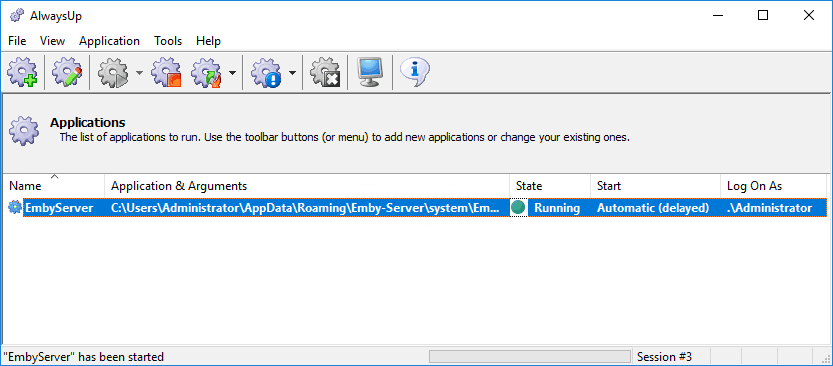
- Click the “save” button to save the settings you’ve made thus far. When you click the “save” button, an Always Up window will appear. It will show the state of the Emby server as “stopped”.
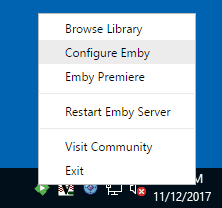
- Once you right-click the green icon, a menu will appear. Select the “configure Emby” tab.
- A new window will open. Make sure the preferred language is English or your native language.
- Below the language settings bar, right-click the box next to the words “run server at startup.” A check mark will appear in the box and will be highlighted in green.
- Expand the “automatic update” section by clicking on it. Click the box next to the words “enable automatic server updates.” If you don’t want automatic updates to occur at any time, do not select the automatic updates option. Save the changes you just made.
- Check the status of the Emby server by selecting “start” and choosing “Emby start” from the Always Up menu. The Emby server’s new status should say “running.”
- You’re done! You are free to use the Emby server to watch all of your favorite media.


Installing the Emby Client
Now in this guide on How to Use and Setup Emby, we’ll focus on Client side.
Contrary to what happens with the server, you can and you should install the client on one or more devices, where you and your users intend to watch the contents from the server.
You can install it on many devices, like:
- Android TV / Box
- Firestick/Fire TV
- NVIDIA Shield
- Apple TV
- Chromecast
- Roku
- Windows Theater
- Theater
- LG Smart TV
- Samsung Smart TV
- PS4
- Xbox one
- Windows Media center
- Xbox 360
- Kodi (Addon for Emby)
- PS3
and in Mobile, like:
- Web client
- Android
- iOS
- Windows
- Windows phone
So, from the device you intend to install Emby client, visit https://emby.media/download.html scroll down to Emby TV or Emby Mobile, and click on your device to download de App.
The app should install and when finished you may find the Emby client on your Apps list.
Connecting both Emby Server and Client(s)
Now in this complete guide for starters on How to Use and Setup Emby, it’s time to put Emby Server working with the clients. This is made by supplying to each client the server’s IP. For that, run both server and client:
- When required by the client, select the server by clicking the button “Add server”
- On “Host” field insert the IP of the server (eg: 108.556.89.15)
- Check if the field bellow for the “Port” is already filled; if not insert “8096”
- Press “Connect” button.
- If you haven’t created other users on Emby server yet, enter the name used when you’ve configured the server
- Same with password
- Click “Connect” and you are done
Now you are able to connect and play what ever you have on your Emby server’s library, from where ever you are!
How to Use Emby
This complete guide on How to Use and Setup Emby, already shown you how to Intall and connect both server and clients; it’s time to tell you how to use it.
If you want to use Emby, you should license the product. Emby is free to use, but there is also Emby Premier. Emby Premier offers a variety of features, including offline media, cover art, and cinema mode. Cloud sync, free apps, and Emby DVR are other features of Emby Premier. Monthly use of Emby Premier is $4.99. Getting Emby Premier access for one year is $54. Lifetime use of Emby Premier is $119.
Using Emby Server
- To use Emby, start the server using the Emby dashboard.
- Select “Live TV” from the sidebar.
- Once the sidebar is open, select the “add” button. This button is located next to “Tuner devices.”
- You can allow Emby to search for tuner devices on your server or add them manually. If you prefer for your Emby server to locate available tuners for you, select “detect my devices”.
- The server will bring up a new screen with the devices that were found. Select the tuner you want and start using it. It’s that simple!
- Emby can be enhanced even further through the use of plugins. Check out our detailed post on how to find and install Emby plugins here.
Using Emby Client
- Start your Emby app from the device you want to watch your library media contents
- Login your user account with your name and password
- Select the content, and enjoy it
Wrap up
In this Complete Guide for Starters you’ve learned the basics on How to Use and Setup Emby. You should be now be able to use this streaming application on many devices, to watch your media contents where ever you are, by accessing remotely to your Emby server.
Though this is an incredible advantage compared with other streaming applications, keep in mind you are connecting remotely to the server. Because this double the risks associated to streaming activities, we strongly advice you to always use a Good VPN like Surfshark when using Emby application.
Have a nice day!
[kkstarratings]
Gugs says
This guide for Emby on MacOS >iOS helped me out so much. Grateful!